sobota, 2 stycznia 2016

Assembling the computer for the gamer

Assembling extremely good computer for a hardcore gamer :-)

First of all you have to choose the parts which will give you this extreme joy.  
  • The MotherBoard - Z170A GAMING Series Motherboards


  • The processor - Intel Skylake i7 6700K 

  • The cooler for the processor - Dark Rock 3 190W TDP
  • The graphic card ZOTAC AMP GEForce GTX980Ti


  • 16GB RAM Mermory DDR4 Crucial Ballistix 2666 MT/s 


  • The hard drive - SSD 512GB  Samsung 850 PRO

  • The second hard drive - WD black 1TB

  • BlueRay LG 

  • The Power supply - Power Zone 750 W

  • The Casing - Silent base 800


In the next post will show you more details how to assemble this really nice machine. 

niedziela, 20 grudnia 2015

How to install a new graphics card

How to install a new graphics card?

Is it hard to install it install a graphics card on my own?


It is no so hard, to do it You will have to use a screw driver and that should be enough ;-).
To start with the installation as always You first need to shut down Your computer and then unplug it. Then remove all the cables.
When all the cabling are unplugged You need to touch some metal to ground Yours self so You will not break Your new graphics card with the static electric current (this metal can be the covering of the PC or radiator etc.)

So now we can remove the side panel and we see the inside of the computer. We need to lie it on the side so the mother-board would lie vertically and the gravity will help us with the mounting :-).


When we open the cover and we have our graphic card out of the box, we need to find the right slot in which we have to insert the card.
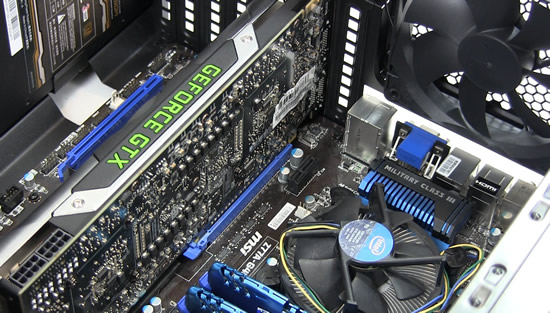
As you can see in the picture above this is PCI Express card. That means we need to find the PCI Express slot on our mother-board.
The slots in the computer are stupid-proof :-) that means every slot has its destination and it would be really hard to choose the wrong one ;-). So you just need to take a close look at your new device and compare it to the holes you see on your mother-board.


What is worth mentioning the PCI Express destined for the graphics card must be x16 cause this one is destined to be used with graphic cards. The other thing worth telling is that the graphics card is always placed as near as possible to the processor.


When we found the right slot which in this case is blue, we remove the metal panel form the cover as you see in the picture above.
Next step is to touch some metal to remove the static electricity of your the hands and to take the new graphics card and delicately but firmly push it to the the right slot.
You need to remember that the radiator of the card is always facing down.


When the card is in place, we need to take a closer look if it is properly placed. No gold connectors should be visible and the card should not be moving.
Next step is to screw it to the hard top of our PC.


Because this new NVIDIA card is power-hungry and at the same time very powerful device we need additional energy to be plugged. We take two 8-pins plugs insert them to the right slots as they we can see in the picture below


Last step would be to close the cover and screw it ;-).

Now we have our new graphics card installed and we need to install the software on our Operating System to use it and enjoy the new features.
To do it, we need to start the system and after that we can take the attached CD with the drivers.
After inserting CD to the drive, the Autorun should start automatically and you can just press "Next" to install default drivers.
Generalny after installation is completed the system will ask you to reboot it.
After the reboot you can enjoy the new features beautiful graphics.

wtorek, 8 grudnia 2015

Fixing noisy radiator


How to fix noisy PC fan? 


Many of You have probably the same problem as most of the users of the computers. After some time the noisy radiator does not let You work with pleasure and You wonder

WHY IS MY COMPUTER SO LOUD !

This is generally caused by the dust. After some time the dust just sticks to the fan and all parts inside such as bearing. It makes the fan harder and harder to spin and causes this irritating noise and we have to listen this noisy fan.
What can we do with it? Do we have to get rid of such noisy power supply ;-) ?
No, we can easily fix our computer and enjoy the silence. We can easily reduce the fan noise.
To fix this noisy fan we must:
  • first to power off your PC
  • unplug it, so there are no power connectors plugged to your PC
  • next you need to unscrew the power supply unit and take it out of the hard top, of course you have to unplug it from the hard drive and the main-board.


  • next step is to unscrew the power supply and take out the big fan out
  • when the fan is released we take unstuck the label of the producer
  • under the label we will find the silicone plug which we easily take out using the screw driver
  • beneath generally is white plastic cotter (sometimes it can be metal), it is not always easy to remove it but it is doable ;-)
  • after releasing the cotter we can now take take the rotor out and since that is plastic, wash it with hot water
  • then we take the ear stick and using nail polish remover (or other delicate solvent) you clean the bearing and the the other adjacent parts or take the compressed air and use it to clean all
  • while the rotor is out we can oil  

  • next step is to put all the parts together
  • after joining the parts of the fan together again we oil it, we would need some machine oil or if we do not have it we can use for example bicycle oil, two drops would be more then enough :-)
  • once we oiled it we can stick our label again, or of we destroyed it, we can use other sticker with the right size or just sticky tape
  • now it is time to put all together again and check if what we did helped
 
  • we place the fan at its position in the power supply and screw it and plug it to the power source
  • then we close the  casing of the power supply and we place it in our PC casing again where we screw it and plug it again to main-board and the hard-drives
  • next and the last step is to plug the PC and check if what we fixed works
With my device i checked the noise decreased from 66 dB to 59 dB, which I think is very good for very easy, cheap and fast repair. This kind of repair in the professional PC workshop would cost about 25$ or more. The cost of our work is the time we spent, the cost of machine oil 3$ in my case (but what is worth mentioning we would still have a lot left to use it for other purposes) the cost of nail polish remover 2$ (or other delicate solvent) in my case.

Enjoy and sent comments if that helped You.